Wednesday, December 21, 2011

DIY: Glittered Ombre Deer


{Glittered ombre deer in candle display}

Every Christmas, as busy as the season can get, the kids and I try to do at least a few crafty projects.  Last year, I had seen a few crafty folk glittering up plastic animals and placing them in displays and terraniums. Ever the glitter fanatic, I made a mental note to attempt a similiar project this year.  With ombre being all the rage from hair color to fashion and homewares, I decided to somehow tie it in and put my own spin on glittered animals.


This is what you'll need:


plastic toy animals (deer, penguins, etc.)
(Schleich is the brand name I used; about $3-5 each)
Mod Podge or other craft glue
small paint brushes
glitter in varying hues


Next, you'll want to decide what color family you'd like to use.  I chose white, gold, copper and brown glitters so that you could really see the gradual light to dark contrast, but any color that suits your fancy will work.  Three to four colored glitters should do the trick.


Next, this is where the glue comes in...brush the very bottom of the animal with glue and shake some glitter on it.  I let mine dry to the touch before I attempted the next color.


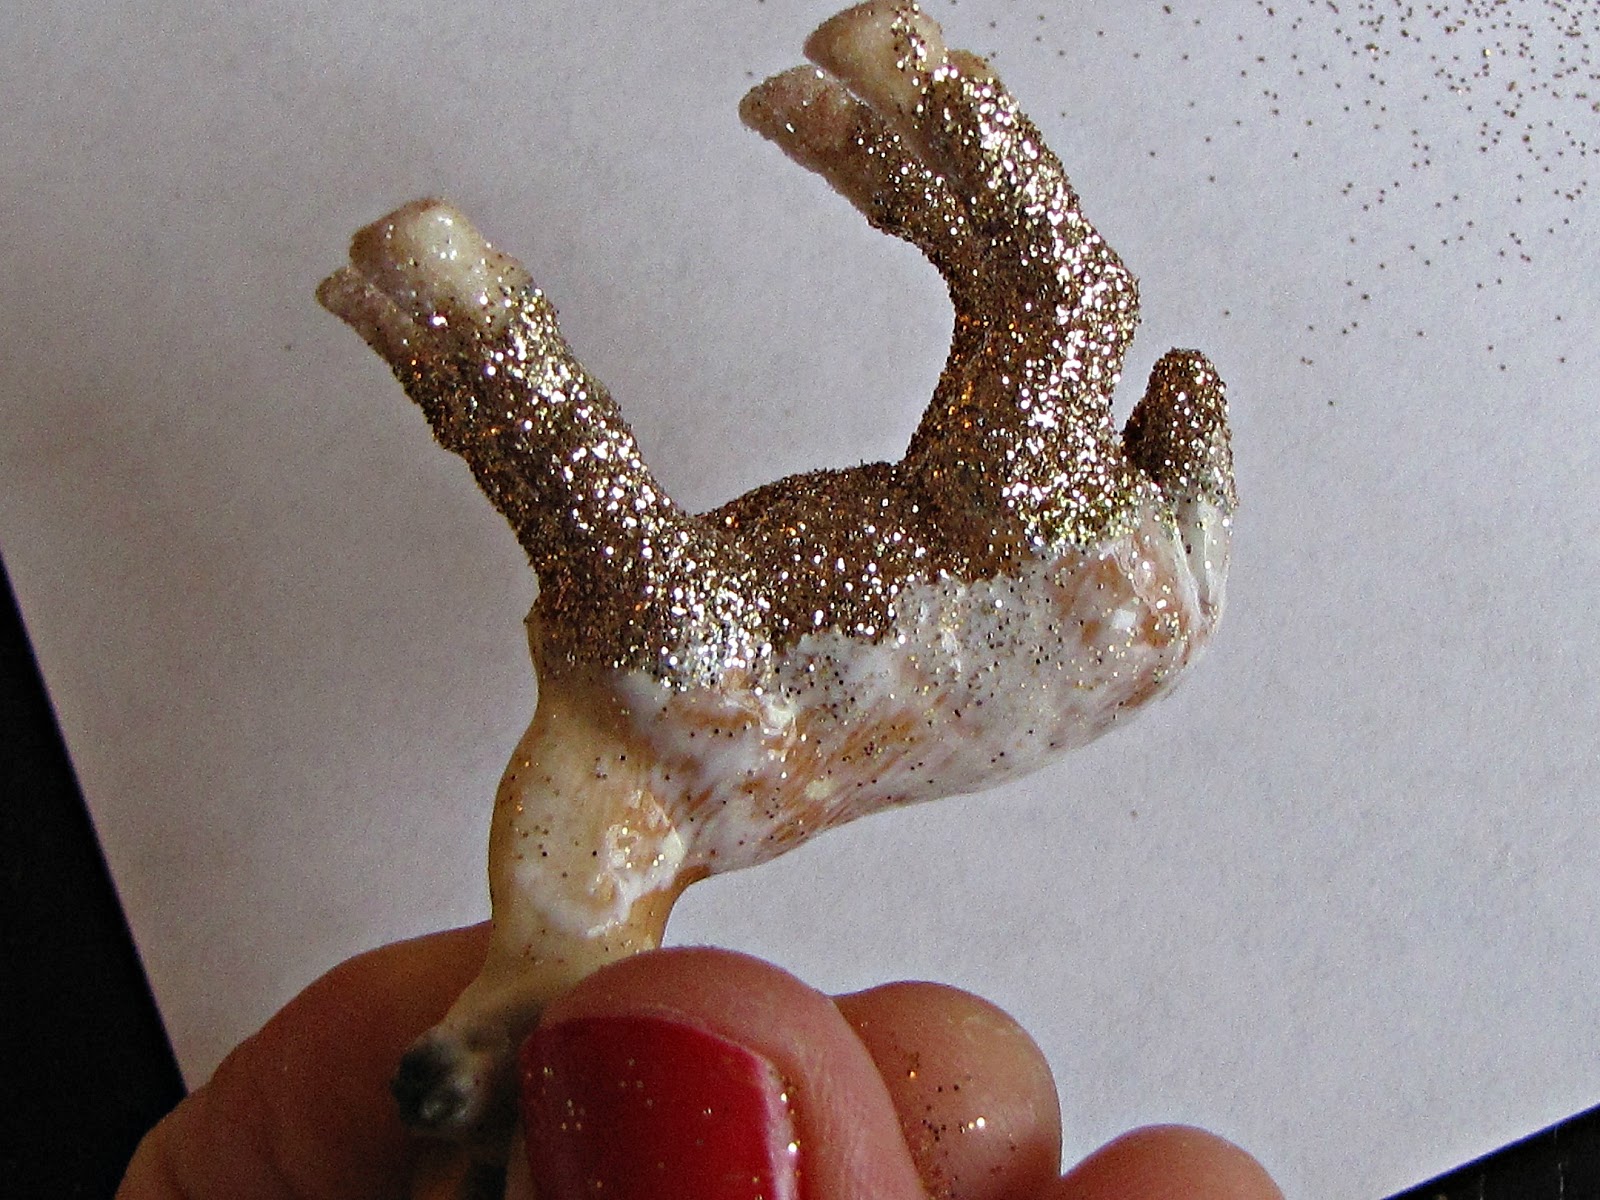
The lighter glitters, such as the white glitter, I had to do about three times so the markings wouldn't show and I could get a decent coat.


I chose to go from light to dark, but you could play around with the color placement 
and be as creative as you like...
As you glitter each section, take your brush and blend downwards so that the color change naturally blends into the color below it. 


And here is the finished ombre deer!  It's an easy, kid-friendly project that doesn't cost very much money and the glittered animals are sweet to tuck in little nooks and crannies around your house.  As with any glitter project, it is a bit messy (we're okay with it!), but if you'd like a less messier medium to work with check out Martha Stewart's line of acrylic glitter glue.

Hope you enjoyed the tutorial and
we'd love to hear what crafty holiday projects you've been doing!


Thursday, November 24, 2011

Pumpkin Bread Pudding with Caramel Sauce


When one thinks of bread pudding, one usually thinks of a very heavy, sweet and dense dessert---not this one! This bread pudding has an almost "souffle-like" texture - so light and not too sweet! Fresh pumpkin puree is so easy to make - just skip the canned stuff! Great combination with the caramel sauce, which I adapted from Thomas Keller's "Ad Hoc" cookbook.

For the pumpkin bread pudding:
  • 1 cup heavy cream
  • 1 cup half & half
  • 1/2 cup light brown sugar, packed
  • 1/4 cup granulated sugar
  • 3 large organic eggs
  • 3 large organic egg yolks
  • 2 cups cooked pumpkin puree, fresh
  • 1 teaspoon ground cinnamon
  • 1/2 teaspoon nutmeg
  • 1/2 teaspoon ginger
  • 1/2 teaspoon allspice
  • 6 1-inch-thick slices of brioche http://www.grouprecipes.com/65955/simple-brioche-loaf.html or challah, cut into cubes
For caramel:
  • 3/4 cup plus 2 tablespoons granulated sugar
  • 1/4 cup plus 2 tablespoons light corn syrup
  • 1/4 cup water
  • 1 1/2 cups heavy cream, warmed
  • 2 tablespoons unsalted butter, at room temperature
  • pinch of fleur de sel
For bread pudding:
Preheat oven to 350. Lightly butter a 9x11 baking pan.
Combine creams, eggs, sugars, pumpkin and spices in a large mixing bowl with a whisk. Place the brioche cubes in another large bowl and pour pumpkin mixture over tham, tossing gently to combine until almost all liguid is absorbed. Pour into prepared baking pan and place into a larger roasting pan, with enough boiling water to come up halfway sides of the baking pan. Bake for 35-45 minutes, or until custard is set.

For caramel:
Combine the sugar and corn syrup in a medium saucepan and stir in the water. Set over medium-high heat and bring to a simmer. Then adjust the heat as necessary to continue simmering. Cook without stirring, for 30 to 35 minutes, until the caramel is a rich amber color. If you want to check the color, use a small spoon to drop a small amount on a white plate. (You want a dark caramel so the finished sauce will be a rich color.) Remove from the heat and slowly whisk in the cream, being careful because the mixture will bubble up. If the sauce seizes, stir it over the heat to slowly remelt any hardened caramel. Whisk in the butter.

To serve: cut bread pudding into cubes and spoon warm caramel sauce over each serving. We also served ours with vanilla bean ice cream.

Posted by Luisa

Tuesday, October 25, 2011

Chocolate Hazelnut Torte: Guest Blogger Regina, Queen of the Chennaults!

Please welcome guest blogger Regina Chennault of Queen of the Chennaults who brings us a little taste of her amazing baking skills!  ~Luisa

I got my inspiration from Martha Stewart's chocolate macadamia nut tart. I love hazelnut with chocolate, so I thought why not use hazelnut instead? Chocolate and hazelnut can never go wrong! The first time I made this tart it wasn't pretty, because I had a very hard time removing hazelnut skin, finally I just gave up. Also, I followed the filling recipe from Martha Stewart (except skipping bourbon and changing macadamia nut to hazelnut), and the tart turned out too greasy because of too much butter used.

This time, I searched online first before getting my hands on the skinning hazelnut-- and... ta da! The trick worked like a charm! If you are trying this recipe, be sure to check out my notes at the bottom on removing hazelnut skin. For the filling, I also cut down sugar and butter.

If you like Nutella, you'll love this tart. My whole family is loving it; we have to control ourselves not to eat too much at one serving. The crust is flaky, and the filling is not oily at all. In my opinion, the tart tastes best when it's chilled, but don't let me stop you! After all, who can resist the temptation of chocolate and hazelnut?


Chocolate Hazelnut Tart (makes one 9 inch tart)

Ingredients:
for tart shell:
1 cup cake flour
5 tbsp ground hazelnut (with skin)– toasted
3 tbsp sugar
5 tbsp unsalted butter (room temp.)
2 tbsp beaten egg-- see note below

for filling:
7 tbsp unsalted butter
1/2 cup sugar
1/2 tbsp golden rum
1/4 tsp salt
2 eggs-- beaten-- see note below
6 oz (about 1 cup) bittersweet chocolate chip
1/2 cup flour
2 cups toasted whole hazelnuts (skin off)-- see note below

Method:
To make tart shell:
  1. Combine cake flour and ground hazelnut then set aside. Using a whisk, cream butter and sugar until fluffy. Slowly add beaten egg, whisk to combine.
  2. Sift in 1/3 of flour mixture. Using a spatula gently mix the flour on the top, then press down the flour to the bottom of the bowl to combine. Repeat with the remaining flour in 2 batches. When all mixture starts to form a dough, take it out and shape it to a ball with both hands (avoid kneading the dough!).
  3. Put the round dough between 2 pieces of plastic wrap, roll it out large enough to fit tart pan. Remove plastic wrap and transfer the dough to tart pan and fold inwards any extra dough so all sides have same thickness. Prick the bottom of tart, then chill the tart for at least 30 minutes.
  4. Preheat oven to 350°F. Blind bake tart for 15 minutes. Cool the tart in the tart pan slightly before pouring in filling.
To make Chocolate Hazelnut Tart:
  1. Preheat oven to 400°F. Melt butter over a double boiler. Whisk in sugar, rum, salt and beaten eggs. Add in chocolate chips and whisk until chocolate almost melts. Remove from heat. Whisk in flour until smooth.
  2. Pour chocolate mixture into tart shell, then layer hazelnut evenly on the top, pressing hazelnuts half way down. Bake for 10 minutes. Turn down heat to 350°F and bake for another 20 minutes, until the crust and hazelnuts are golden brown. Cover the top with foil if it browns too fast. Cool the tart on a rack. Serve at room temperature or chilled.
Regina's Note:
  • Beaten eggs: I beat 2 eggs in a bowl, scooped out 2 tbsp for tart shell and used the remaining for filling.
  • How to skin hazelnut: boil hazelnuts and 1 tsp of baking soda in a deep pot, covered with enough water, for 2-3 minutes. Be sure to use a deep pot as the water will spill after adding baking soda. Drain hazelnuts. Rub the skin and it should come off easily.  Pat skin-off hazelnuts dry, then toast them in the 350°F oven for 15-20 minutes.


Monday, August 29, 2011

Coconut Crush.


The cooler weather (by that I mean 70-80 degree temps; usually it's smokin' in August) is foreshadowing fall, here in the midwest.  However, I'm revolting and churning out as many ice cream flavors as I can before the leaves start to tinge!  As much as I love fall and the change of seasonal food (soups and stews, hot chocolate and apple anything!), I'm a summer girl through and through.  So in my last ditch effort to celebrate the waning days of summer, I recently made a coconut concoction that really stole our hearts.  And oh, good god my friends...We are besotted!

We coined it 'Cherry Ice Cream Smile' after a line in a Duran Duran's song Rio, because well, I like that song and it makes me think of a tropical kind of summer. And I think I can vouch for Luisa and Lori, we all love Duran Duran (Lori remember you were going to marry Simon-or was it Roger? And I was going to marry John?). To live up to its name, it's loaded with cherries (of course), tropical coconut,  toasted almonds.  And it's every bit as luscious as Simon LeBon...

(Also making a note to use homeade dried mangoes or chopped up almond joys in lieu of cherries next time this is made).


Recipe adapted from David Lebovitz's 'Toasted Coconut Ice Cream'
(from the book The Perfect Scoop):

Coconut Cherry Ice Cream (a.k.a. Cherry Ice Cream Smile)

For custard:
1 cup dried shrededed coconut, preferably unsweetened
1 cup slivered almonds
1 cup whole milk
2 cup heavy cream
3/4 cup sugar
big pinch of salt
1 vanilla bean, split in half lengthwise
5 large egg yolks
1/2 teaspoon vanilla extract, or 1 teaspoon rum

For cherries:
recipe here, drain cherries before adding to ice cream machine
or use canned cherries in syrup (not cherry pie filling!)


{the shining stars of the ice cream}

Preheat the oven to 350 degrees farenheit.  Spread the coconut on a baking sheet and bake for 5-8 minutes, stirring so it toasts evenly.  Likewise, toast the almonds at the same temperature for about 10 minutes until lightly toasted.

In a medium saucepan, warm the milk, 1 cup of the heavy cream, sugar and salt and add the toasted coconut.  Use a paring knife, and scrape all the vanilla seeds into the warm milk, then add the pod as well. Cover and remove from the heat.  Seep at room temperature for about 1 hour.


{vanilla bean yumminess}

Rewarm the coconut-infused mixture.  Strain the mixture through a strainer into a saucepan.  Press the coconum down fimrly to exract as much flavor as possible.  Remove the vanilla bean pieces and discard the coconut.

Pour the remaining 1 cup of heavy cream into a large bowl and set strainer on top.  In a separate bowl, whisk egg yolks.  Slowly pour the warm coconut-infused mixture into the egg yolks, whisking constantly.  Place the egg mixture back into the saucepan.


{yolks from eggs via 'the ladies'}

Stir the mixture constantly over medium heat with a heatproof spatula, scraping the bottom as you stir, until the mixture thickens and coats the spatula.  Pour the custard through the strainer and stir into the cream.  Mix in the vanilla or run and stir until cool over an ice bath.

Chll the mixture thoroughly in the refrigerator, then freeze it in your ice cream maker according to the manufacturer's instructions.  Before the mixtures sets (is soft-set), add cherries and almonds.  Place in the freezer for a firmer ice cream.


***I made ice cream cone bowls to accompany the ice cream, but I found them to be a little tricky to make without a waffle cone maker because I had issues with the cone sticking to the pan, despite many attempts. (A waffle cone maker is now on my list of must-haves).  Here's the recipe here if you want to tackle making these; they are tasty!!


Posted by Dawn

Wednesday, August 17, 2011

Basil Blueberry Ice Cream.


At the beginning of summer I made a to-do list of all the things I wanted to accomplish, and one of those things was to create some frozen treats befitting of those warm summer days that scream for, well...ice cream of course!  With summer nearing an end soon, I thought I'd get after crossing that goal off the list.  Enlisting my daughter Elena in my ice cream-making endeavor, we decided to tackle making a basil-blueberry flavored ice cream inspired by one of of our favorite vendors that sells these addictively delicious blueberry basil cupcakes.

The ice cream has several steps, but as always, was well worth the effort.  It's aromatic, refreshing and intriguingly different...even my picky 10 year-old couldn't stop eating it.  We found the fantastic recipe in David Lebovitz's book, The Perfect Scoop.  (It's an amazing book that includes some classic flavors, but also an encyclopedia of brilliant, creative choices.  Seriously, it's the only ice cream book, you will ever need!). 

Enjoy!


Recipe from David Lebovitz :

Basil Ice Cream

For custard:
1 cup packed Italian basil leaves
3/4 cup sugar
2 cups heavy cream
1 cup whole milk
pinch of salt
5 large egg yolks
1 lemon, preferably unsprayed (or orange)

For blueberries:
1 cup blueberries
1/4 cup sugar
2 teaspoons lemon (or orange) zest
2 teaspoons basil, finely chopped

Prepare your ice cream maker, according to the direction manual.

Using a blender or small food processer, grind the basil leaves with the sugar and one cup of cream.  Grind the basil as fine as you can get it.  Pour half of the basil mix into a bowl and add 1 cup of the remaining cream.  Place a strainer on top, and set aside.


In a medium saucepan, over medium heat, stir the other half of the basil mix with the milk and salt.  In a separate bowl, whisk the egg yolks.  Slowly pour the warm mixture in to the yolks, whisking constantly.  Place the mixture back into the pan and stir constantly over medium heat until thickened (The mixture should coat the back of your spoon or spatula).

Pour the custard into the strainer over the cream.  Zest the lemon (or orange) in the custard and then chill in an ice bath.  Place the custard in the refrigerator until thoroughly chilled.  Meanwhile, wash blueberries and place in a bowl.  Top with a sugar, zested orange rind and chopped basil.  Let macerate in the refrigerator.


Freeze the custard according to your ice cream maker manual.  Right before the ice cream sets, place the macerated blueberries (drained) into the ice cream maker. 

Makes 1 quart.


Posted by Dawn.

Friday, August 5, 2011

Coconut Cream Pie Parfaits


Over the weekend, we headed into Chicago and wanted to make something that was easy and portable to take along for a picnic.  We've been going sans dessert for awhile and wanted something sweet to satiate our deprived taste buds and settled on making a Coconut Cream Pie.  I was running late and wanted to speed up the process, so I nixed making a pie and opted to do it in a parfait style dessert instead, placing layers of  graham cracker crust, coconut cream and whipped cream into mason jars (which as of late, I have a slight, unhealthy obsession with).

Well they worked out fabulously!  The coconut cream was smooth and creamy and I opted to use real whipped cream over whipped topping. I used a graham cracker crust the first time I made this, but it's really optional (photos posted are sans crust) and you could easily substitute sugar or chocolate cookies in it's place.  Next time, I'll make a mental note to freeze the desserts beforehand so they also double as ice packs for the rest of our picnic food (I prefer creme pies in a semi-frozen state anyway!).  It's also nice to have on hand when unexpected company pops in or for those times you crave something sweet.  By all means if you want to bypass the humble, but charming mason jar you can also use a footed dessert dish or up the ante with a martini glass. 

Either way, it's a fun, nostalgic treat!


Coconut Cream Pie Parfaits (adapted from here):

For graham cracker crust:

3-4 graham cracker- large rectangles, crushed
2 t. sugar
2 T butter, melted

For coconut cream:

3 cups heavy whipping cream
2 eggs
3/4 cup white sugar
1/2 cup all-purpose flour (or 1/3 c. corn starch)
1 can of creme of coconut
1/4 teaspoon salt
1 cup flaked coconut, toasted
1 teaspoon vanilla extract

For topping:
1 cup heavy whipping cream
1 t. vanilla
1-2 t. sugar to sweeten


{coconut cream, whipped cream and toasted coconut}

Preheat your oven to 350 degrees.  Cover a baking pan in foil and add coconut. Toast for about 5 minutes, stirring occassionally.

For the coconut cream, add flour or cornstarch, sugar and salt in a medium sized saucepan.  Whisk in cream slowly.  Add the creme of coconut, followed by the eggs.  Bring to a boil over low heat, stirring constantly (about 15-20 minutes).  Remove from the heat and add 3/4 cups of the coconut and the vanilla extract.  Chill in the fridge for about 2 hours.

To make the whipped cream:  Use a mixer or hand immersion blender to whip the cream.  When it starts to set, slowly sprinkle the sugar and vanilla extract into the mix. Continue to whip until thick and fluffy. 

Spoon in a few teaspoons of graham cracker crust mix to the bottom of your jar or glass. Next layer 2 teaspoons of the coconut cream, whipped cream and top with a sprinkling of toasted coconut.  Continue layering if you like!  Top with a final dollop of whipped cream and a generous sprinkling of toasted coconut. 


Posted by Dawn.

Monday, July 25, 2011

Spice Cake and Fleur de Sel Caramel Sauce.


Hi! I'm Elena and I'm Dawn's daughter.  I really like to cook and it's one of my favorite hobbies.  My favorite things to make are pesto, curries, and other vegetarian dishes. My signature dish is Pumpkin Soup.

 I got this cookbook as a present from my Grandma and Grandpa. It was my Grandpa's mom's and her name was Elizabeth.This is one of my favorite recipes out of this cookbook. I've found a lot of really interesting recipes in there, like Sea Foam Candy. The Spice Cake looked really interesting so I was like "What the heck? Why not try this one?"


Here is my Great-Grandma Elizabeth, my Grandpa {he's the smallest one} and his brothers.


My Great-Great Grandma gave it to my Great-Grandma. This book was used a lot! It's so cool because it was put together in the 1950's.


Here's the recipe:

Spice Cake

1 1/2 cups white sugar
1/2 cup shortening (I used butter)
3 eggs- beaten
2 1/2 cups cake flour
1 teaspoon cinnamon
1/2 scant teaspoon cloves
sprinkle of nutmeg
1 teaspoon soda
1/2 teaspoon salt
1 cup sour milk (buttermilk works)
nuts

Can you believe that they're weren't any directions? I mixed the ingredients in order it was listed. Grease an 8 inch circle pan + bake the cake at the standard 350 degrees for about 30-35 minutes. I checked the cake about 20 minutes in. You should be good!
- Recipe from Mrs. Clifford Blix

Luisa gave us some Fleur de Sel Caramel Sauce from 'Trader Jacques'.  It was really creamy and sweet.

Here's another recipe for caramel sauce if you want it to go with the cake.  It came from my Great-Grandma's cookbook too:
Caramel sauce

3/4 cup white sugar
1/2 cup brown sugar
2 tablespoons corn syrup (you can substitute golden syrup)
1/4 cup rich milk
1/2 teaspoon salt (or fleur de sel)
1/2 cup of butter

Boil about 8 minutes.  Stir.  Do not overcook. 
-Recipe from Mrs R.A. Gundersen


The cake wasn't heavy and it wasn't light. It was right in between.  The cake also wasn't too sweet. It was just right in my opinion! I would so make it again!


Well, I hope you really like the recipe!
Please let me know if you make the cake~
Ciao!

Thursday, July 14, 2011

Banana Coffee Smoothie.


Last week, we made numerous batches of this yummy treat for breakfast, to go with dinner + for dessert.  Apparently we couldn't get enough because we recently restocked our banana-coffee smoothie arsenal to create a couple more batches this week.  Even my son Fordy surprised me (he's not a huge coffee fan), but he gulped this down with nary a complaining word + even asked for more.

It's extremely easy to whip up on busy mornings~ usually my kiddos aren't very hungry when the school bus comes at an ungodly hour in the morning + would rather drink their breakfast.  This summer it's been our go-to, effortless + light breakfast when the humidity is already climbing.

I bet you even have most of the ingredients on hand:


Coffee Banana Smoothie Recipe:

2 c. vanilla yogurt
1 c. strong coffee, cold
splash of milk
1-2 bananas (we say the more the merrier), frozen
1/3 c. melted chocolate or chocolate syrup
2 t. sugar (honey or agave syrup), optional

Throw everything in your blender + give it a whirl. Top with whip cream if you're feeling decadent!
  Makes 2 servings.


We also have swapped out the yogurt with vanilla ice cream {you could also use coffee ice cream in lieu of vanilla + replace the cold coffee with milk if you want a more subtle coffee flavor} to make an equally delicious milkshake. You can also add a few teaspoons (or more to your liking) of espresso powder in a pinch if you don't want to brew a carafe of coffee. I should also mention that chocolholics abound around here + it seemed only fitting to add more chocolate to the smoothie. That's the beauty of smoothies, anything goes!

{Warning: Approach with caution... They're pretty addictive!}


Posted by Dawn.

Monday, June 6, 2011

Luisa's Trip to Atlanta, GA


My friend Amanda, who recently moved to Austin TX, won an online contest for tickets to the Atlanta Food & Wine Festival. She knew her husband wouldn't really be into it so she invited ME (how awesome is that?!?!) Of course I accepted because I knew I'd probably never get a chance to go to an event like this for free again (well, not totally FREE - I had to cover airfare and hotel but still... great opportunity!)


Please enjoy the photos from our trip below :-)


Arrival: Thursday, May 19th

menu at Eleven, Loews Hotel.
we were tired from our flights and decided to just eat at the hotel restaurant in the lobby by the bar...


Amanda's blue iceberg: bacon, shropshire blue cheese, tomato green goddess dressing
 

My forest mushroom cappuccino soup, truffle foam, rosemary biscotti
the soup was awesome and very "truffley" - the biscotti, not so great. It was too sweet and wasn't fresh
  
My 1st fried pickle experience: cornmeal fried pickle with buttermilk green goddess. Yummy.
I have a jar of pickled green tomatoes that Dawn shipped to me that I will use instead of pickles so I can recreate this!
 
 Opening Reception: "Sugar" on the Loews Hotel Terrace 


interesting cocktails... not very season freindly and not my favorite flavors (sambuca, anise, bitters)

it was love at first sight... until we realized the cupcakes sucked

aren't they pretty though?


Friday, May 20
 
very first seminar of the trip: bomb ass charcuterie by Chef Kevin Ouzts of Spotted Trotter


Tete Pressee - Pressed Pigs Head with citrus pickled fennel fronds, Lamb Tongue Terrine - with a Mayhaw Salpicon and Fresh Peaches, finished with Lamb and Veal Glace - Georgia Sorghum and Black Pepper Salami - with D' avignon Radish Butter and confit shallots - Veal Bologna - Pepperoni - Shaved Southern Tasso, Spicy Rabbit Rillettes En Croute - with Rillons and Blueberry Caviar - Three Chilie Chicharrones
 
The Lee Brothers!

The boys about to prepare a fish and grits breakfast. We were lucky enough to later catch an elevator ride with just us and both of them... woo woo!
 
Connoisseur Lounge Opening Lunch
 Anthony Giglio & Julia Le Roy

Chicken Rilette with local pickled veggies
the pickled okra - which I have never had before - was my favorite part!
  
ummm, where's Todd English??? He was supposed to have been the chef for this lunch... WEAK!


live centerpiece on each table. cute!


The lunch menu


 Street Cart Pavillion


they served tasty lamb meatballs (too bad they were raw in the center!)


Lamb-Fennel Meatball, fresh Goat Cheese, Harissa


Alabama Tea Cake - coconut flavored

these cupcakes were sooooo good! beat out the ones they served at the reception hands down!


Connoisseur Dinner with Michele Bernstein!

very friendly "mixologist" serving some more funky cocktails
(poor thing had just spilled some all over his arm!)
 

there's my girl! and she's FRYING CHICKEN! I was so happy to see her :-)
 
so yeah, my plate is a HOT MESS but it was GOOD! I even ate the shrimp head.

Banana Pudding
Although a bit too sweet, I loved the addition of banana bread to it; soaked up the goodness!
 

Saturday, May 21 (it's my birthday!)


Sweet and Savory Spreadables with David Guas, Chef/Owner, Bayou Bakery, Coffee Bar & Eatery

bacon marmalade (I got the recipe from David, yay!), lemon curd and pepper jelly on mini buttermilk biscuits...mmmmm mmmmm!
 
"Hot Tamale" class with Chef John Currence.


Street Cart Pavillion revisted

I HAD to have the "Thelma" dulce de leche cupcake again!

super tasty jambalaya, smoked pork tenderlion, and catfish
(I would never buy catfish because they are bottom feeders and taste "muddy" to me but this one was pretty damn good!) 
 

Back to the hotel for JOHN BESH!

my latest chef crush (pitter patter)


after sharing shots in front of us with some of his peeps, he declared shots for everyone! avocado-tequila!

 
there were no bowls to sample his asian inspired shrimp bisque so everyone made due with whatever we could find - in my case, someones abandoned plastic cup from the tequila shot... it was delicious!


hawt schtuff... I was too shy to talk to him!
 
"Say Cheese Ya'll!" Seminar (last one of our trip)
with Tim Gaddis from Star Provisions,
Adam Spannaus from Blackberry Farm and a woman from Sequatchie Cove (can't remember her name).

1 -"Brebis", a soft ewe’s milk cheese, is produced earlier in the season and is similar to a Chevre. It has a rich and supple texture that is light on the palate. It is slightly tangy, yet well balanced.
2- Goat's milk cheese with ash, inspired by Humboldt Fog, called "Ellington"
3- Cow's milk cheese, washed with beer and rind pressed with crushed cocoa nibs, called "Chocolate Lab"
4- aged pecorino style cheese called "Singing Brooke"
5- Tallegio style cheese, soft ripened, called "Trefoil"
6- sheep's milk blue cheese (still premature but so good!) called "Blackberry"


My Birthday Dinner at Richard Blaise's Flip Burger Boutique


iceburg disc – bacon, tomato, blue cheese dressing ~ more fried pickles, yay!


and finally...San Francisco... home sweet home! :-)